Showing posts with label General Tips. Show all posts

Sunday 19 December 2021

Forgot / Change / reset your Windows 10 password

 Reset your Windows 10 local account password

  1. Manually power-off system 3 times ( illegal shut down - press the power button)
  2. Power on - You can see "  Preparing Automatic Repair "
  3. Go to Advanced Option on the screen
  4. Click on Troubleshoot Option
  5. Go to Advanced Option on the screen
  6. Go to System Image Recovery  on the screen
  7. On popup " Cancel "  then " Next "
  8. Click to Advanced button  ==> Install a driver  ==> click " OK "
  9. It will open a popup file browser windows/system32 folder
  10. Find the file  Utilman  and rename it to utimanold , refresh, then rename file " cmd "  to Utilman
  11. Close close ( cancel cancel ) popups and then " choose an option Continue "
  12. After restart ->on bottom right corner you can see second icon " Ease of access " , it will open command prompt
  13. c:/windows/system32
  14.  Type " net user "  and enter , you can see a list administrator , users in the system
  15. Type " net user user *   "  ( where second user is the username for laptop) and enter
  16. close then click arrow icon of login
Thursday 2 February 2017

Publishing your android App to Google Play Store

Publishing your app

$ cordova plugin rm cordova-plugin-console
$ cordova build --release android
This will generate a release build based on the settings in your config.xml. Your Ionic app will have preset default values in this file, but if you need to customize how your app is built, you can edit this file to fit your preferences. Check out the config.xml file documentation for more information.
Next, we can find our unsigned APK file in platforms/android/build/outputs/apk. In our example, the file was platforms/android/build/outputs/apk/HelloWorld-release-unsigned.apk. Now, we need to sign the unsigned APK and run an alignment utility on it to optimize it and prepare it for the app store. If you already have a signing key, skip these steps and use that one instead.
Let’s generate our private key using the keytool command that comes with the JDK. If this tool isn’t found, refer to the installation guide:
$ keytool -genkey -v -keystore my-release-key.keystore -alias alias_name -keyalg RSA -keysize 2048 -validity 10000
You’ll first be prompted to create a password for the keystore. Then, answer the rest of the nice tools’s questions and when it’s all done, you should have a file called my-release-key.keystore created in the current directory.
Note: Make sure to save this file somewhere safe, if you lose it you won’t be able to submit updates to your app!
To sign the unsigned APK, run the jarsigner tool which is also included in the JDK:
$ jarsigner -verbose -sigalg SHA1withRSA -digestalg SHA1 -keystore my-release-key.keystore HelloWorld-release-unsigned.apk alias_name
This signs the apk in place. Finally, we need to run the zip align tool to optimize the APK. The zipalign tool can be found in /path/to/Android/sdk/build-tools/VERSION/zipalign. For example, on OS X with Android Studio installed, zipalign is in ~/Library/Android/sdk/build-tools/VERSION/zipalign:
$ zipalign -v 4 HelloWorld-release-unsigned.apk HelloWorld.apk
Now we have our final release binary called HelloWorld.apk and we can release this on the Google Play Store for all the world to enjoy!
(There are a few other ways to sign APKs. Refer to the official Android App Signing documentation for more information.)

keytool -genkey -v -keystore acharyasri-key.keystore -alias acharyasri -keyalg RSA -keysize 2048 -validity 10000

jarsigner -verbose -sigalg SHA1withRSA -digestalg SHA1 -keystore acharyasri-key.keystore platforms/android/build/outputs/apk/android-release-unsigned.apk acharyasri

zipalign -v 4 E:/MobileApps/aacharya/android/build/outputs/apk/android-release-unsigned.apk Acharyasri.apk

Google Play Store

Now that we have our release APK ready for the Google Play Store, we can create a Play Store listing and upload our APK.
To start, you’ll need to visit the Google Play Store Developer Console and create a new developer account. Unfortunately, this is not free. 

Thursday 1 October 2015

How to make Windows 7 bootable install USB stick

Install Windows 7 from a USB drive


Preparing the USB drive:
  1. Open command prompt as administrator - Right click on Start > All Programs > Accessories > Command Prompt and select Run as administrator or type cmd in the Start search bar.
  2. Run diskpart utility by typing diskpart into command prompt window and pressing “Enter”.
  3. Locate your USB drive disk number by executing list disk. We'll assume the USB drive is 1.
  4. Run the following commands:
    1. select disk 1
    2. clean
    3. create partition primary
    4. select partition 1
    5. active
    6. format fs=NTFS
    7. assign
    8. exit
Now we have prepared USB drive. Lets make it bootable:
  1. Insert Windows 7, 32/64-bit installation disk into DVD drive. Let's assume it's D
  2. Go to D:\boot (cd d:\boot)
  3. If your USB drive letter is “e” please run bootsect /nt60 e:
  4. Copy DVD Windows 7 media content to USB root folder (etc. don't put it into any folder)

  1. Install Windows 7 from a USB drive 
cmd-prompt-usb-bootable

Next type
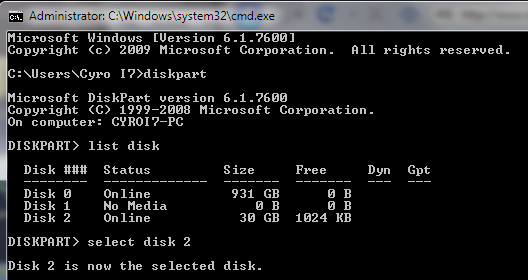
DISKPART
this loads the diskpart application we need to proceed
Then type
LIST DISK
the image above shows our 32 GB USB drive is listed as DISK 2
so you have to type
SELECT DISK 2 (your USB Drive may have a different number, don’t follow exactly this text it depends on your usb drive)
You will get a successful response “Disk 2 is now the selected disk”
Clean Cmd USB Drive
Next we want to clean the USB drive
Type:
CLEAN
you will get a successful response ‘DiskPart succeeded in cleaning the disk”.
Clean USB Drive

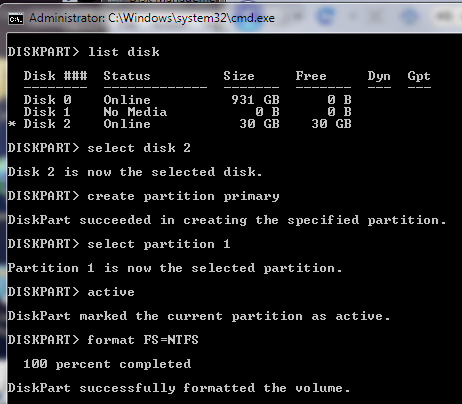
After the drive is cleaned follow the list in the image above (detailed below in list order) – you can also note the successful text responses from the OS as you enter each command.
SELECT DISK 2 (or what number your USB drive has)
CREATE PARTITION PRIMARY
SELECT PARTITION 1
ACTIVE
FORMAT FS=NTFS
Formatting can take a little time depending on the size of the drive, our 32GB unit took about 10 minutes to format - you will see a percentage readout until it is finished.
Bootable USB Final Cmd Prompt
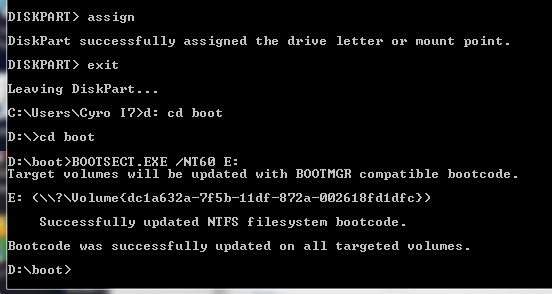
Next type:
ASSIGN
EXIT (DISK PART will exit)
Type D: CD BOOT (substitute the “D” if necessary with the letter of your Windows 7 DVD drive)
then key
CD BOOT
then
BOOTSECT.EXE /NT60 E: (substitute the “E” if necessary with the letter of your now ready USB drive) – we are telling the system to create a boot sector file on the USB drive.
Now you can exit the command prompt and copy all the files on the Windows 7 DVD to the USB drive.
Once this step is finished you’ll be ready to boot from this drive, all you need to do is configure your motherboard bios setup to boot first from USB rather than hard drive or optical drive. If you don’t know how to do this, refer to your specific motherboard manual or search the internet.

Monday 3 November 2014

How can I run two Skype accounts ?


In the Run window, enter the following command (include the quotes) and press OK:


"C:\Program Files\Skype\Phone\Skype.exe" /secondary


On Ubuntu Run this command on terminal:

skype --secondary

Sunday 13 July 2014

Connect to BSNL Broadband using Router

Configure Beetel 110TC1 ADSL2+ Router for BSNL


Open http://192.168.1.1 in your browser. Use the following username password to login

username : admin
password : admin or password

You should be greeted with the Beetel 110TC1 configuration page.
Click on Interface Setup
For Virtual Circuit, you can choose either the default PVC0 or PVC2. If you choose PVC0, then you need to set VPI = 0 and VCI = 35 (This is specific to BNSL).
 If you choose PVC2, the default values are 0 and 35.


NB :- For me  Virtual Circuit:  Status PV0 is Deactivated with VPI = 1 and VCI = 32
  
PVC2 status Activated with VPI = 0 and VCI = 35
Servicename : BSNL
Username:uname
Password: password
Encapsulation:  PPPoE LLC
Bridge Interface: Deactivated
Get IP Address: Dynamic


Under the ‘PPPoA/PPPoE’ section enter the user name/password combination provided by BSNL. For me the username as first two characters of my first name follower by my telephone number along with the STD Code. That is ni80xxxxxxxx. The password is ‘password’.
Save your changes.
The next step is to set the DNS entries, navigate to the sub-tab ‘LAN’ under ‘Interface Setup’.
Under DHCP, change the DNS Relay to ‘Use ZAuto Discovered DNS Server Only’.